DIY Solutions for a Leaking Refrigerator
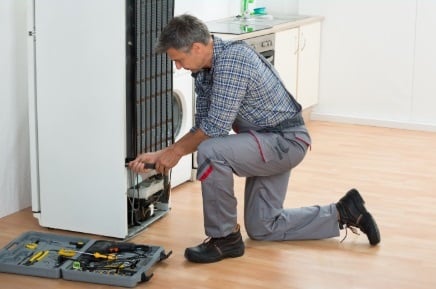
Have you been dealing with a refrigerator water leak that is damaging your kitchen floors? If that is the case, we can help you sort it out. A fridge is one of the most important appliances in every household today. It enables us to preserve perishable items, store food, freeze our water, etc.
However, because of how much this gadget is being relied on, it can sometimes develop errors and malfunctions. In such situations, it can halt your activities and put a dent in your daily schedule. If you wish to avoid this issue, you can call us at Care & Repair and hire our experts to fix fridge leak issues within a few hours.
Other than that, you can also try to take care of these problems by yourself if you love DIY approaches and want to minimize the expenses involved with expert maintenance. Hence, let us now take a detailed look at the most common causes of refrigerator water leaks and figure out the best ways you can tend to them quickly and effectively.

Understanding Refrigerator Leaks: Why Do They Happen?
A refrigerator water leak may seem like a major drawback, but it is one of the most common ones that you will come across. Starting from regular upkeep mistakes to complicated component breakdowns, this problem can occur because of several reasons. Therefore, it is better for you to stay calm and try to fix it yourself before jumping into hiring a professional. Nowadays, there are a bunch of DIY approaches that you can leverage to address these drawbacks and resolve them within a short time.
When it comes to simple maintenance errors, you need to understand the source of the issues and look for solutions that can target them. This aspect will make it convenient for you to save time and money needed for hiring experts. However, you can always give Care & Repair a call to ask for some refrigerator maintenance tips. You may also do the same when our repairers visit your place for an upkeep session.
Common Causes of Refrigerator Leaks
To smoothen the troubleshooting and prevention process of your fridge maintenance, you need to first acquire a thorough understanding of the causes. You may think that all leaks happen because of the same reason, but that is not true. Each of these drawbacks can stem from different components, requiring separate refrigerator leaking solutions.
Although some overflows may require you to opt for certified appliance repair, you will be able to handle others yourself. As a result, identifying the origin of the compilation will allow you to ask for the correct kind of leaking fridge solutions while reducing water damage to your kitchen floors by a wide margin. Hence, let us now take a look at some of the most common errors that lead to water spills:
Blocked Defrost Drain
One of the most common components that cause water leaks in refrigerators is a blocked defrost drain. It is a pathway that gets rid of excess water that is formed during the defrost cycle. However, a lot of items, such as food particles, debris, and ice can accumulate here over time, which hampers the water flow and makes it leak out into the kitchen floors.
Damaged Water Lines
If you have a refrigerator that comes with a water dispenser or ice maker, you should know that these two components often lead to overflows. It is because they can often develop cracks or suffer from loose connections if you have been using them for years. Once that happens, the excess water can run down the insides of your refrigerator and damage the equipment. Hence, it is necessary to conduct a water line check every few weeks to ensure your convenience.
Compromised Door Seals
It is quite common knowledge that a fridge is opened and closed several times a day by different individuals in the house. These motions can wear out the rubber gaskets present in a refrigerator door seal over time. As a result, warm air finds it easy to seep into the apparatus and create moisture buildup, which leads to condensation and water leaks. If you want to reduce the possibility of this problem, clean your door seal regularly and replace it when necessary.

Comprehensive Refrigerator Leak Diagnosis and Repair Guide
When you are faced with an unexpected fridge leak, it can throw you off and make you feel overwhelmed. At first glance, this drawback may seem like a major technical complication that requires professional refrigerator leaking solutions. However, that may not always be the case, so it is important for every homeowner today to learn how to diagnose the severity and source of these problems. Once you do that, you will be able to save a significant amount of money on necessary fridge repairs and get your appliance backup within a short time. Therefore, let us now take a deeper dive into an appliance repair guide to ease your challenges!
1. Examining the Defrost Drain: Your First Line of Defense
The minute you locate a leak in your fridge, the first thing you need to do is take a thorough look at the defrost drain. This is because the pipeline is in charge of getting rid of excessive water, resulting from melted ice or condensation. It is easy for this drain to become clogged because of debris, dirt, food residue, etc. Hence, here are a few steps you can use to clean it:
Tools You’ll Need:
To clean your defrost drain thoroughly and get rid of any items blocking the way, you will need a few tools, such as:
- Warm water
- Mild dish soap
- Turkey baster or small funnel
- Soft cloth or sponge
- Pipe cleaner or small brush
Cleaning Process:
Once you have all the essential equipment to scrub the defrost drain and fix fridge leak, this is what you need to do:
1. Locate the Defrost Drain
You should first examine the back and the bottom of your refrigerator to find out where your defrost drain is located. A small hole or water channel that is used for draining should be your marker.
2. Clear Visible Blockages
Spot any visible debris, dirt, or food residue that may be blocking the pathway. You can use the help of a pipe cleaner or small brush to scrub and get rid of the blockages successfully.
3. Flush the Drain
Once the particles are removed, create a mixture of soap and warm water to pour down the drain. Take the help of a funnel to put this solution inside the drain and clear out any accumulated debris that may be too hard to reach manually.
4. Test Drainage
After the cleaning process, keep in mind to test the drainage system by observing the water flow. If the stream is usual and fast enough, it is a sign that the equipment is working well again. However, if the flow is still slow, it is better to call for professional refrigerator leaking solutions immediately.
2. Checking Water Lines: Preventing Hidden Leaks
If you have been using your refrigerator continuously for a few years now, the water lines can develop issues. Some of them get cracked or damaged while others become filled with dirt or debris. As a result, it is super vital for you to conduct a water line check every few weeks to ensure efficiency. Let us now take a look at a few ways you can inspect and fix these problems at home!
Inspection Steps:
If you wish to examine the water lines without any expert assistance, here’s what you need to do:
1. Visual Examination
The primary thing that you need to take care of is conducting a visual examination to spot cracks, wear, or loose connections. Before you do that, remember to unplug the device from the socket and pull it away from the wall for your safety.
2. Connection Check
Check all the water lines to make sure they are all connected to the refrigerator securely. Find out if there are any indications of rust, corrosion, or dirt buildup. When you come across any loose screws or wires, tighten them immediately.
3. Potential Repairs
Once you have a thorough understanding of the damages, choose the accurate refrigerator maintenance tips for each. Keep in mind that the way you fix the components will make an impact on the functionality, so be as careful as possible. If the damage is too severe, consider hiring an expert for help.
3. Refrigerator Door Seal Inspection and Maintenance
Every refrigerator door seal is in charge of preventing warm air from getting into the appliance and causing moisture buildup, which leads to leaks. As a result, if the rubber gaskets in the seal get damaged or worn out, it won’t be able to attend to its responsibilities appropriately, making your gadget falter. This is where regular inspection and upkeep come into play because they allow you to boost the efficiency of the door seal. Here’s all you need to do to attend to these details!
Seal Examination Techniques:
For optimal performance of the door seal, a few rubber gasket examination techniques that can help you out are:
1. Visual Inspection
The first step you should take is to take a thorough look at the door seals to spot any physical damages, such as cracks, tears, or hardened/brittle areas. Also, find out if there are any gaps between the door and the seals after closing the fridge.
2. Paper Test
If you wish to check the efficiency of the door seal, put a paper between the gaskets and the door during closing and make sure it hangs out partially. In the event that the paper slides out with a tiny pull, it is a sign that your seal is not working appropriately and requires replacement.
3. Cleaning and Maintenance
Pay attention to monthly cleaning and maintenance of your door seals if you want to reduce the need for replacements or professional leaking fridge solutions. Use the help of a mild soap solution and a soft cloth to remove any dirt or grime that may be present on the rubber gaskets. To reduce friction, you can also apply a thin coat of petroleum jelly on the seals, making it easy for them to last for years to come.
4. Advanced Troubleshooting for Persistent Leaks
Have you already tried all kinds of refrigerator leaking solutions for your appliance, but there is still water coming out of your appliance? If so, it is time for you to take a few more additional steps. Since some leaks can be quite persistent, troubleshooting them will require more effort and knowledge. Hence, let us now take a detailed look at some extra approaches:
Professional-Level Diagnostics:
When none of the DIY steps in the appliance repair guide work out in your favor, you should move on to professional-level diagnostics, such as:
1. Level Calibration
Sometimes unleveled placement of your refrigerator can cause water leaks by a wide margin. As a result, you should get your hands on a carpenter’s level and check the alignment of the equipment. If it is not perfectly horizontal, use external stools or placemats to acquire alignment.
2. Drain Pan Inspection
As you may already know, there is a drain pan under every refrigerator holding excessive water, debris, food particles, etc. You should take out this vessel and examine it for cracks or overflow problems. Try to drain this pan every few weeks, so that there is no chance of spillage or bacterial growth.
3. Internal Component Check
The ice maker or the water dispenser of a refrigerator can often develop leaks over time, so you should check their waterlines regularly. You should also make sure the internal water supply is intact and there is no overflow in any way.
If you think you can only leverage refrigerator leaking solutions with the help of an expert professional, you are in for a surprise. Sometimes these leaks stem from issues that are quite minor and can be handled at home using a few DIY steps, making it convenient for you to save time and money thoroughly. However, if the damage seems internal and complicated, you can hire Care & Repair professionals to tend to them at your convenience!