Learn how to clean a dryer
If you know how to fulfill the proper cleaning of your dryer, you will have all the chances to prevent numerous problems in the future. We would like to share some arguments why you should add the cleaning of the dryer into your annual to-do list:
- You will keep yourself in safety since about 15000 fires in the USA are caused due to dirty clothes driers.
- The clogged dryer takes a much longer time to dry clothes. Thus, you will save some money on electricity bills.
- The dirty dryer causes the heavy tumbling in the drum, so your clothes can get pills and excessive tensions and, as a consequence, may look fraying and fading.
Know when to clean is vital
We are against any needless cleaning. The exception is if you are obsessive about cleanliness. But if you see these signs, described below, it means your dryer needs to be cleaned:
- After the regular cycle, the clothes are not fully dry.
- The dry cycle takes too much time as it is stated in the user’s manual.
- When the cycle is completed, the garments are fairly hot to the touch.
- When the appliance is cycling, it produces some burning smell.
- Some kind of humidity and dampness are being felt in the room where the dryer is standing.
Tools required to do the cleaning
The entire cleaning process is not so complicated as it might seem at first glance. Therefore, you won’t need many tools to fulfill the good cleaning. Make sure you have the following tools on your spot while cleaning the dryer:
- Set of screwdrivers
- Dryer lint remover kit (usually sold in home stores)
- Vacuum cleaner
- Metal foil duct tape
You would also need some materials: soap, water, microfiber, brush, cleaning spray, spatula.
How to clean dryer vent
Before you start cleaning your dryer, make sure the electric or gas supply to the appliance is disconnected.
Step1
Cleaning of the lint filter. It is typically located in the front of dryers, so it is rather easy to take it off. Just take the filter and easily pull it up. Prepare the warm soapy water to sink the lint filter into it and let it soak for a while. Afterward, gently rinse the filter and dry it with the soft cloth.
Step2
The next step is to clean the lint trap housing. To fulfill the quick and high-quality cleaning, the following items will help you much: vacuum cleaner, curtain rod, and pipe bender. Bent the curtain rod with the pipe bender and attach it to the vacuum hose. Such a homemade “appliance” will easily clean the inside of the lint trap housing.
Step3
It’s time to clean the dryer duct. Discard the duct from the wall it was attached to, as well as from the dryer itself. Use the brush (from your kit) to clean the duct. While cleaning it, gently rotate the brush along its inner walls till the end of the duct. Repeatedly get rid of the debris accumulated on the brush. At the end of the duck, you will find the vent cap – it also has to be thoroughly cleaned. Inspect the condition of the flapper and make sure it is functioning properly. It might be better to test it outside.
Step4
Now we will reattach the duct to the dryer. Use a zip tie and (or) UL-listed metal foil duct tape. Before reattaching the duct to its place, remove any lint and debris that can be built upon the backside of your dryer. Then attach the duct to both the dryer and to the vent in the wall. After the dryer duct is successfully rejoined, you may turn the gas or electricity on (it is up to the type of your drying machine). Turn your dryer on and verify whether the appliance is operating and venting in a proper way.
It goes without saying that the regular cleaning of the dryer ductwork and vent will make the dryer work more efficiently and won’t mistreat your clothes.
Step5
Cleaning of the exterior of your dryer. To do this we need to use the microfiber cloth and the cleaning spray that is appropriate for dryers. Spray all sides of your dryer and wipe them off. Don’t forget to clean the buttons and knobs where debris usually packs abundantly. Use the brush to speed up the cleaning.
How to properly clean the inside of a dryer
After having cleaned the dryer duct and the vent, it turns to make the inside of your dryer clean as well. You can’t even imagine how much lint, dust, and any other debris is building up inside. The clean interior will prolong the life of your dryer and prevent any possible lint fires.
Discard the lint trap
Discard the lint trap and put it into the sink with warm soapy water. Let it soak, afterward rinse it slightly with the brush. Let the air dry it. While the lint trap is drying, we will clean the dryer drum.
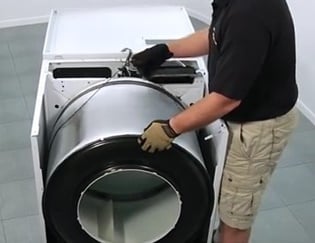
Remove thrums
Remove thrums, pieces of tape, threads and any other items that could be stuck inside or in the fins if your dryer is of the older model. Clean the interior of the drum with a wet microfiber. If you noticed some stubborn residue, moisten the drum walls with the warmed olive oil and slightly scrape them with the spatula. You can also use a paste made of baking soda and warm water. After you have done away with sticky messes, spray the interior of the drum and wipe it off.
Lint trap
Put the dry lint trap into its position. Turn your appliance on. Make sure it is functioning correctly with no smells or unusual noises.
What to do to keep Your Dryer Clean
To keep your dryer clean, you are to follow some handy pieces of advice which are easy to perform between the big cleaning-ups:
- After each cycle takes off the lint trap and cleans it up.
- Once a month clean the lint filter using the brush and the warm soapy water. Spray the inside of the drum and wipe it with the microfiber.
- Don’t put the washed pet-bedding into your dryer. Let it dry outside.
- Consult the qualified professionals if you noticed any cracks or suspicious signs of malfunctioning.